Wednesday, February 22, 2017

Magnet Board for Tim's Office

Tada!


I haven't done much with the basement lately, but for Valentine's Day I wanted to give Tim the magnetic board I had been planning for his office.  I knew it would be fairly easy to make because I had done the same thing for the kids' room in our old house.  I got the idea from Teachpreschool.org.  I simplified it a bit for Tim's office, I didn't paint it and I simply screwed it into the wall instead of using velcro tape.  Using an oil drip pan is an affordable way to get an extra large magnet board, I think this one was around $13 at Walmart.  I also wanted some magnetic storage.  I had seen some cool options at The Container Store:


But spending $10-$15 for each piece seemed unnecessary.  I knew I could do something similar for a lot cheaper.  So I headed to my local Goodwill and grabbed a few inexpensive containers.


I paid $1.50 for all three containers.  Then I pulled out a can of spray paint I had left over from spray painting our patio furniture last year.  I gave everything a couple of coats of blue paint.


I then hot glued some magnets that I've had for at least 10 years to the back of each container.  I purchased them and then never used them.  I count the magnets and spray paint as free, since their cost has already been accounted for in a different project.  The long, low container fell off the magnet board as soon as Tim put something in it, the paint and magnets just peeled right off of the plastic back.  I scraped more paint off of the back and then re-glued the magnets on.  This time it worked, but it isn't shown in the picture because I hadn't fixed it at that point.  I also made some magnets using pictures I had printed off of the internet.  I used my button maker and simply glued a magnet on the back of each button instead of attaching a pin.


I'm pleased with how this has turned out and hope Tim gets a lot of use out of it!


Wednesday, February 8, 2017

Quick and Easy Window Shade Update

Sofia has a pair of very old window shades in her bedroom.  They work, mostly, so I didn't want to get rid of them and spend more money on new ones.  They are, however, a little messed up.  Both had small holes in them and one was ripping.


So I used packing tape to fix the tear from behind and then glued some old and free rick-rack using Tacky glue.


You can see that I just ran a line of glue across the front of the shade and stuck the rick-rack to it.  I then trimmed off the ends.


I had to pull the shades out so that the rick-rack wouldn't slide off while the glue was still wet.  Once they were completely dried I was all done.  Easy-peasey!


Close up


Tuesday, February 7, 2017

DIY Easy Art

I've been wanting to make something to take up some wall space in my living room for a while.  There is a nipple (that's the best way I can think of to describe it) for hanging something on the wall.  Instead of taking it out and patching the hole before painting, I just left it.  Bad decision.  It is too high up on the wall for a normal sized picture to fill the space well.  I made this "art" to try and fill the space, but I think that even its large size doesn't make up for its overly-high placement.

I'm sure you've seen this done before.  So did I!  That's why I made it.  I like the look of the quotation art that's on everyone else's wall and I wanted some too!  Now that I have it, I'm not so sure it was the right way to go.  A small quotation piece looks cute along with a variety of other art all hung together.  A ginormous quotation piece just looks like it's missing something.  Oh well, here it is anyway:


Here's how I did it.  I started with this large painting (I use that term loosely, it is printed on a thin board) that I got at a church rummage sale for $3.


The frame was pretty awful, so I started with that.  First I cleaned it, and the entire picture, with wet rags.


Then I primed the frame.


Then I painted a couple of coats of dark grey on the frame, an improvement from the weird gold marbleized pattern that had been there originally.


Next I chose my fonts and cut my REM quote out of contact paper.  Some bad choices were made here, as well.  First of all, my quote is so long that I had to use a smaller font to fit it all.  I think it would have looked nicer with more of the painting showing through, so a shorter quote with larger font would have looked better.  Also, clear contact paper was not the best idea.  Try placing your quote on a picture when you can't see the letter you are placing clearly, let alone the ones you've already stuck to the picture!  Anyway, that's how I did it but I suggest you not follow my example!  Here's the mess that was left over after cutting all the letters out:


I then used painters tape to hopefully keep the lines even and level.


I placed the letters (which still had their backing on so you can see them) in order to get a feeling on how well they fit.  Then I went on to the painful process of trying to stick my letters to the picture in a somewhat straight manner (with dubious success).  I'd show you a picture of this, but you can't see the letters so it would not look like much!  I peeled off the painters tape and covered the entire thing with two quick coats of a very light yellow I had on hand.  I was worried about how it would look when I peeled off the letters, but they were relatively un-smudged and the contact paper was very easy to remove.


I had to do some touch-up of the frame, and then finally hung it on the wall!  It's nice to have up there, but I feel like maybe I should add something to the bottom left corner.  What do you think?

Here it is again, a little wonky but finished!

Saturday, January 21, 2017

Storage Bins

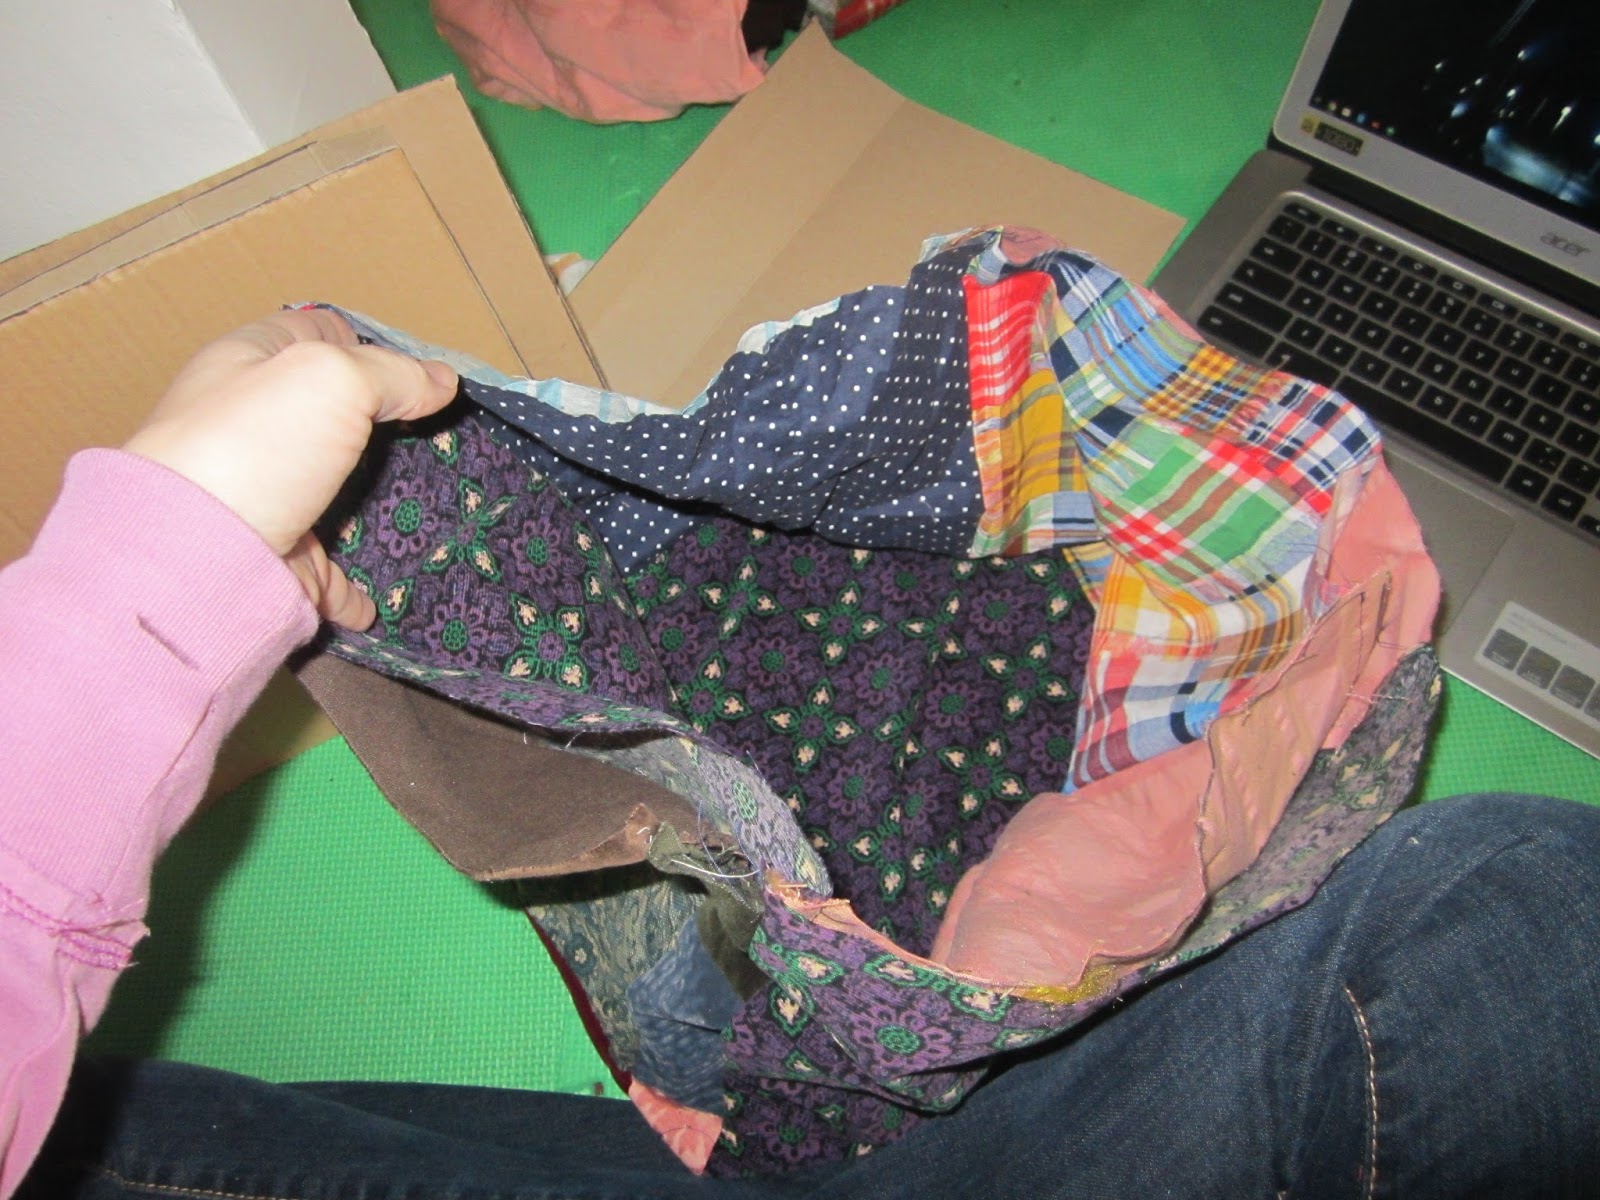
After spending more money than I was hoping to on Sofia's new room I wanted to save as much as possible on the finishing touches.  I needed storage boxes to fit into the shelves we're using to store Sofi Sue's clothing.  I decided to make them myself with the large amount of scrap fabric I have hanging around my craft room and some cardboard that was otherwise headed for the recycling.  First I cut out a million 11 1/2" by 11 1/2" squares of fabric.  It might have been somewhat less than that, but who's really counting?  I used a square of cardboard as my pattern and traced it on the wrong side of the fabric with a sharpie.


Then, after cutting the squares out I sewed three together in a row.


After that I sewed two more on either side so my fabric looks like a plus sign.


Then sew each of the outer squares to its neighbor and you have a very floppy box.  Do the whole thing twice and you have a box and a lining.  In order to make the box stiff I then cut out another million squares, this time out of cardboard.  I made each of these about an inch smaller than the fabric pieces, so about 10 1/2" by 10 1/2".  Place one cardboard square into the bottom of your outer box.


Then put your lining, inside out, into the outer box.


Now slide a square of cardboard into all four sides of your box between the lining and the outer fabric.


Fold the outer and inner box fabric towards the cardboard, pin and sew it closed.


You can see that the box is no longer floppy, but the fabric is still a little too loose, so I used a needle and thread to sew a couple of knots through both layers of fabric in all four corners.


The boxes aren't perfect, but they hold clothes and fit perfectly in Sofia's shelves.  Here's the first one in:


See how the clothing in the shelves without bins are spilling all over the floor?  Look how much better it looks when all of the clothing is in a bin:


The best part of these bins, each side is a different fabric, so you can change the look just by spinning the boxes around.


And each box also has one side that is the same fabric, Sofia's favorite patchwork fabric:


Now, maybe, Sofia will keep all of her clothing put away!  Yay free bins!

Tuesday, January 10, 2017

Under Bed Curtain

When planning Sofia's room I decided it would be nice to have a curtain to section off the area underneath the loft.  This way we can hide any mess Sofia makes under there.  I also thought it would be a fun little area to play where you can close yourself off, almost like a fort.  So I took a white sheet and cut it to size.  I only had to hem the bottom because the other three sides were already finished.  Then I prepared a space in the basement to decorate the curtain.  First I protected the floor with painters paper.  Then I taped the curtain down flat so that I could draw on it with permanent markers.


I wanted to draw an easy forest scene so I copied some birch tree wallpaper and a fox that I had seen online. I drew the outlines of trees


 and then added the details.


After that I used acrylic paint and watered it down a lot.


I got this method from Filth Wizardry.  I painted the sky between the trees, leaving the trees the white of the sheet.  I used red and brown for the fox.


Notice how I did not draw in a body for the fox.  I made a practice picture on the part of the sheet I cut off, just to make sure that this was going to work.  My fox body was pretty sad, and the fox legs and feet were just horrendous.


So, now the fox is hiding behind a tree.  Problem solved!

There is one thing to note about this method of painting.  Since the paint is watered down the end result is that the paint bleeds.  So if you paint up close to the edge of a tree with blue and don't go over the edge, after a couple of minutes the paint will bleed over the edge.


I actually don't mind this, I think it makes the whole thing look like watercolors.  It's very pretty.
 What I love about this method of painting on fabric is that it is cheap and it leaves the fabric soft.

After the curtain dried I threw it into the dryer on high heat to hopefully set the paint.  Then I attached it to Sofi Sue's loft.  I had already purchased a tension rod from Ikea along with curtain clips.

Sorry for the blurry photo!

 I just clipped the curtain up and it was done.  I'm pretty happy with how it turned out and Sofia gave me glowing praise, although delivered very tepidly after I asked if she liked the curtain.  She told me she didn't like it, she loved it.  I'll take that.


Monday, December 26, 2016

A Roof for the Chickens

My chickens are major wusses.  When it's snowed so far this year they have pretty much refused to leave their coop or the area directly under the coop.  They do not like snow.  I decided to give their enclosed run a roof so that they'd have some snow-free ground to scratch around on.

Here is what their run looked like before:


I bought some clear pvc panels so that snow could not get in but sunlight still would.  We wanted to angle the panels away from the coop so that rain would not be funneled right to the coop so we screwed a few 2X4 scraps to the top of the run.


This was a perilous job because to reach the back of the run against the garage I had to sit on a ladder laid across the top of the run:


I spent a lot of time telling Tim how unsafe I felt.  You can see the feet of the ladder wrapped in plastic shopping bags.


I didn't want to get it all muddy and chicken-poopy because we use this ladder inside.  After attaching the wood we screwed in one piece of the plastic panel.  It is long and thin, so it had to run the length of the run along the garage.  Then we laid the second panel overlapping the first and used our drill to drill pairs of holes through both panel.  I then zip-tied the panels together.


This made one large panel that was 8 feet long and about 4 feet wide.  We then screwed the whole thing into the closer side of the run.  It now looks like this:


It does not go the entire length of the run but it will hopefully leave enough clear ground when it snows that the chickens will leave their coop occasionally.  Of course, I don't blame them for holing up inside.  That's what I mostly do in the winter too!