Saturday, May 28, 2016

Buying a Small Sectional Sofa

I could have cleaned up the space and taken a better picture, but I didn't.  Nothing but the second best for this blog!

We got our couch right after getting married in 2003.  Up until having kids who could move around, it held up pretty well.  It has always been comfortable and large enough for what we needed.  But as soon as the kids were mobile, the poor couch started to deteriorate pretty quickly.  I like allowing the kids to make forts out of the couch and to lounge about on it as they please, but they also like to jump on and off of the couch and use it as their own personal bouncy house.  The middle of the couch now sags very  noticeably and the pillows are flat and misshapen.  It is obvious that it is time to get a new couch and reign in our children's exuberance.  But our living room is pretty small and my tastes run to mid-century and expensive.  After reading the new book from Young House Love I realized that at this stage in our lives a beautiful and expensive couch might not be the best idea.  Instead I'm compromising with a sectional that can seat more people when we have Supper Club and will be comfortable for us on our weekly Movie Night.  After looking around the internet for a while I have settled on the Chamberly 3 piece sectional.

 Chamberly 3 Piece Sectional - Signature

It is small enough that it should fit our space and is a little less frumpy than most sectionals out there in my price range.  Tonight I taped it out on our floor to see how much space it would really take up.


Although it fits in the room I was surprised by how little floor space was left.  At the same time, it seemed as if the couch was smaller than I thought it would be.  So this tiny sectional is going to take up half of our room!  I guess we'll have to get creative with how we use the rest of the space!

Friday, May 27, 2016

Basement Craft Room

When mom was here she helped me to clean our basement in preparation for Sofi Sue's birthday party.  So for the first time in months my craft room was presentable enough to take pictures of.  It is a work in progress, but it is a very low priority.  That means that in a few years I might get around to doing some of the things that I want to do to make this room more girly and fun.  Here it is!

The view from the laundry area towards the kids' play rooms.  I've had that branch hanging over the doorway since high school!
Now, I call this my craft room when, in fact, it is more of a craft hallway or pass through.  When we bought the house the basement was set up as a small apartment and this was the kitchen.  On the left is a hook up for a stove and on the right are the cabinets and sink.  A sink is a useful thing in a craft room and the cabinets are great storage so those stayed.  The old stinky fridge that was in there, however, left.  I even got $50 for it from ComEd for getting rid of an outdated appliance!


This is the antique cabinet I bought years ago and used as a craft storage cabinet before having kids.  Then, when my craft room became the nursery in our old house I put a changing pad on the metal counter and it became a changing table.  When Sofi Sue came along I added the flower and heart stickers and now it has come full circle and is back to housing craft supplies.

Wall of Yarn

My awesome sister-in-law Judi kindly donated these plastic buckets.  I screwed them directly into the wall (you can see the empty one on the left has three screws in the back) and then shoved as much yarn as would fit into them.  I also have a couple upright for knitting needles and whatnot.


My card catalog was a lucky freebie.  Years ago when I first got out of college I worked at a catholic school.  They were dismantling the library and getting rid of this, so I scooped it up!  It used to be nicely organized and labeled, but now there are just supplies shoved in willy-nilly.  Some day I would like to reorganize and label it.  Above the card catalog is a little romper that Tim wore as a toddler and my Aunt Sharon's dress that she wore to my parents' wedding.


Here is the sink and cabinet area.  I'd like to paint the cabinets light pink at some point in the future.  I added some tension rods to hold ribbon.  This seems like a great idea, but is a total pain in the butt once you use up a roll.  It is extremely difficult to remove the tension rod and pull off the ribbons, so I have just left the empty rolls hanging.  Above that is a shelf where I have put my crafty books.  There's also an Ikea magnetic knife holder I accidentally bought more than 10 years ago.  I meant to buy one, but since they are magnetic three of them stuck together and ended up coming home with me.


This is my work area.  I bought a semi-cheap table from Ikea.  I would have preferred something used but I really wanted to have a table and didn't feel like waiting around for something cheap or free to show up.  This is where I sew and occasionally do other crafts.

Megara -
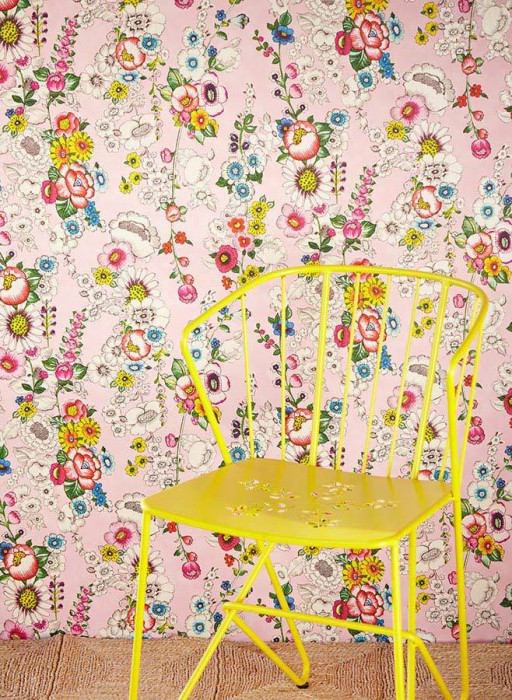
This entire website has awesome wall paper!

I was hoping to put up this gorgeous wall paper but ended up deciding not to spend money on that right now.  There are a lot of other things that need to be done to my house before I get to the craft room.  So I decided instead to start hanging all of the random semi-art I had hanging around.  I know I have a lot more to hang, I just haven't unpacked all of the junk from my old house yet.  The goal is to cover the entire wall with pictures and color and pattern.

So that's it, my craft room in progress.  There is also a large closet that I can't show you because it is blocked by boxes of fabric, but really all that is in it are boxes of fabric so it isn't very picture worthy.  I'm hoping to use up a lot of my scrap fabric on a project for Sofi Sue's bedroom.  I'll show you that project when it gets underway!

Wednesday, May 25, 2016

More Sprouts!

I'm super excited that sprouts have grown in my two previously sad looking raised garden beds!  I now see sprouts where mom and I planted the Sunset Runner Beans, Snap Dragons, Alexandria Strawberries, Caserta Summer Squash and Rainbow Carrots!  Of course, it has now been raining buckets this evening so I am worried that my delicate little plants might be drowned by morning.  And then it is supposed to thunder storm for the next five days!  Is it possible that these cute little guys will still be healthy and growing at the end of this week?  There's even a little lake forming where I planted the Ali Baba watermelon and Goliath pumpkin!

I hope this little guy doesn't swim away tonight!

In other news, I used two S hooks and some chain to hang a little bouquet of ferns for the chickens.  They have been pretty starved for fresh greens since we banished them to the chicken toilet (otherwise known as the nice sized run we toiled to make for our spoiled pets).  They quickly ate everything inside the run and everything their little beaks could reach through the fence.  Hopefully this will make them happy, a fresh weed or fern bouquet each day!


Maybe the extra greens will help whichever girl laid this ridiculously puny egg yesterday!

Paulie looks shocked, or maybe a little chagrined! 

Monday, May 23, 2016

Progress on the Living Room

That title might be a little misleading.  There technically hasn't been any more progress in the living room, but I did move everything out of there today so that I could hopefully start to make some progress.  I moved all of the furniture into the dining room.

Doesn't this look cozy?

Then I moved the cork flooring that we had hiding behind our couch into the little storage area off of our eat in kitchen.  It had previously housed our computer, but we've had to relocate that for the time being.  This had better be the last time that I move 1,300 pounds of flooring.  I've already moved it from the street to the dining room, from the dining room to the living room, and now to the storage room.

I'm covering it up with a sheet because the sun comes in that window like crazy.

It does seem like we should have thought of putting it in there in the first place, but I prefer to act first and think later.  It uses fewer brain cells.  Now the living room looks like this:


I'm hoping that I can get the following done in the next two weeks:

1. rip the trim off the wall around the radiators
2. patch the walls
3. add a 1X2 above the window to make it look nicer
4. sand and paint the window trim
5. wash the walls
6. paint the walls

You would think that blogging about the work I'm doing in my home would give me more of a sense of purpose, make me feel that I am being held accountable.  So far that doesn't seem to be the case and I've been just as lazy as I was before I started.  So I have my doubts that this list will be accomplished in the next 14 days.  We will see.

Friday, May 20, 2016

Something's Growing!

Last week the raised beds finally got filled and I threw in the seeds I had bought from Baker Creek Heirloom Seeds.  I've been impatiently waiting for something to come up while fearing that the heavy rains that came for several days after planting would have washed away the seeds, or at least buried them too deeply to sprout.  Yesterday I finally saw a few tiny seedlings in the center bed.


It looks as if my Strawflowers, Dahlias and Giant Noble Spinach are coming up.  Now I've just got to wait for the other 14 types of plants to sprout!  At least my fruit bushes from last year look healthy!

Blackberry

Blueberry

Raspberry
 I got these last spring from Stark Bro's.  I'm hopeful that I'll get some fruit this year; last year the blueberry bush produced one berry and the raspberry bush produced a handful.  Nothing yet from the blackberry, that slacker!  And I know you've been eagerly wondering how my little 3 in 1 apple tree is doing.

Ta Da!
It's made tons of leaves and seems very happy in its new home.  For next year I'm thinking of adding a 2 in 1 cherry tree and maybe some dwarf pears!  I've never been much of a gardener before, but planting food is oddly addictive, I can't seem to stop slowly adding more to my little collection. 


Wednesday, May 18, 2016

Awesome Old Houses For Sale!

I'm very happy with my house, but I can't help myself.  I still look on Realtor.com to see what else is out there.  From time to time this bites me in the butt because I see something I like better and could afford.  But mostly I'm content with what I have.  I've now found an even better site to look at.  Historicproperties.com has some awesome houses, some even come with land.  If you've always wanted to live in an old church, this place is for you!

-

For only $75,000 this little beauty could be yours, if you were willing to live in Macomb, Illinois.

Or maybe you want a property with a little land.  For only $36,000 you could have 3 acres with fruit trees and this gem!

 -


The site should really work on their pictures (I know, look who's talking) but I can see that I will be wasting a lot of time looking for houses I have no intention of buying on this site!  You're welcome!


Tuesday, May 17, 2016

Basement Play Rooms

I have been wanting to put pictures of the basement up on this blog for a little while now.  The reason I haven't been able to until now is that I am a slob.  The rooms in the basement were way too messy to show to the public.  Enter my mother.  Mom came to visit and helped to clean up the toy rooms so that we could host Sofi Sue's birthday party without any children being swallowed into a black hole of clutter.  The play rooms are two small rooms at the front of the basement.  They are the first rooms I fixed up when we moved in because I wanted the kids to feel at home and have a place to play and keep their toys.  Here is how they looked before:


And here is how they look now:


I pulled up the carpeting and added a bright green foam floor from HERE.  I painted the walls white because I had already put a lot of color on the floor.


 Tim and I put in the rock climbing wall, added a trapeze and painted one wall with chalkboard paint.


 In the second room we added an art desk and a rack to hang dress up clothing on.


I love the fabric I found for the curtains and I made little curtain tie-backs out of pieces of branches.


The light I have owned for years, but the original shade had fallen to pieces, so I bought fabric to make a new shade.


I decorated with old classroom posters that I found at a garage sale.


Thanks for cleaning up these rooms Mom so I could finally put them on the blog!  Love you!


Tuesday, May 10, 2016

Sofi Sue's Pokemon Birthday Party (Jiggly Puff Pinata)

I haven't been doing much work on the house lately because Sofia is having a birthday party this weekend.  My house is always a complete mess so I had to stop fixing it up in order to clean it up.  My mom is in town and has been helping me to clean and get ready for the party.  Sofi Sue is into Pokemon, so that is the theme this year.  This is what I made today:

Fancy Pants Jigglypuff Pinata

For all you Pokemon noobs out there this is Jigglypuff.  Or, at least it is supposed to be.  Henry commented that it was sad that poor Jigglypuff was going to be beaten in order to get at the goodies inside.  I doubt that will prevent him from taking the first wack or diving for Jigglypuff's innards as they spill onto the ground. 

Monday, May 2, 2016

Muumuu Redo

I have seen these muumuu makeovers on the internet before and wished that I had an old muumuu to redo myself.  Then, the other day (which in my method of time keeping can be yesterday or two years ago) my workout buddy Nancy asked if I would like to go through her father's house to pick out what I liked.  He had moved out and no one was interested in putting on a garage sale.  I was, of course, overjoyed at the prospect. I love old stuff, I love free stuff, and I love looking at other people's houses. This was a win win win!  I found a large box full of goodies, including this red, white and blue muumuu in one of the closets!


I forgot to take a picture before removing the right sleeve.  You get the idea.

I searched for a good tutorial online and found newdressaday.com.  It seems like the usual redo for a muumuu involves ripping out the sleeves so that the cool yoke detail is more obvious and then either shaping it to fit your body or letting it stay flowy.  I decided to leave it flowy but add a belt to give it a little bit of shape.  My pictures are, as usual, deplorable but I feel that I have sunk to a new low with my standing on the toilet shots.  Here they are!

First I removed both sleeves using a seam ripper.

Don't mind the dried concrete on my fingers.

Then I pinned the seams around the arm holes and sewed them flat.


When sewing something that I want to look good I never back-stitch.  Instead I leave my thread long and use a needle to put all of the threads to the wrong side of the garment and tie the ends together.  I think my sister-in-law Judi might have given me that trick.  She is a much better sewer than I am, you should check out her etsy shop HERE.


It still looks very much like a muumuu.

It doesn't help that I am wearing a fleece with a similar color so that you can't see the neck detail.

Then I decided the length I wanted and cut off the extra fabric.


I turned the cut edge under twice and sewed the hem.


I added a belt (not a good looking one, but one I grabbed at a bag sale hoping it would look better than it did) and did one last top of the toilet picture.


I am trying to decide if I should take in the top just a little bit so that the underarms aren't so large and so that there isn't quite so much fabric gathered on top.


Overall, if I can find I cute belt I think that I will definitely wear this dress this summer!  I love doing things for my house, but it's nice to do something for myself as well once in a while!

Sorry about the potty shots, I do have a full length mirror in my house, but it is in this closet, so standing on the toilet is the only way to see my outfits for the time being.

If you look closely enough you can see the partially opened closet door behind all of my very necessary stuff.