Monday, November 28, 2016

Christmas Cookies!

Now that Thanksgiving is over I'm allowing myself to start thinking about Christmas.  And for me, that means Christmas cookies!  Over the weekend I made my first two batches!  They're now safely tucked away in the freezer until the gorge-fest on Christmas Eve!

Lemon Melting Moments


They don't look like much but they're deliciously lemony and do kind of melt away in your mouth!  I pinned this recipe years ago but when looking for a link I've found that the website I got it from is gone!  I found recipes that were almost exactly the same but they called for something called custard powder.  So here's the recipe that I've been using that doesn't call for ingredients I've never heard of!

Ingredients:

Cookie
1 3/4 cups softened butter
1/2 tsp salt
1 cup powdered sugar
3 cups all purpose flour
1 cup cornstarch
2 tsp vanilla extract
zest of 2 lemons

Frosting
2 cups powdered sugar
1/2 cup softened butter
juice of 2 lemons

Prehead oven to 300 F.  In a large bowl cream the butter, salt and sugar until light and fluffy on a medium setting, roughly 3 minutes.  Reduce the speed to low and incorporate the vanilla and lemon zest.  Sift the flour and cornstarch into the mixture and beat on a low setting until just combined.

Take small portions of the dough and roll into balls.  I just press them flat with my hands.  Place them on the baking tray lined with parchment paper.  Bake for 20 minutes, then let cool completely.

For the filling beat the sugar, butter and lemon juice on a medium setting until incorporated.  I usually have to add more powdered sugar until the frosting is a bit thicker so that it won't just run off of the cookies.  Then I place the frosting in a bag, cut off the corner and pipe a nice sized dollop on top of each cookie.  Let harden a little before storing.

This recipe is supposed to be for sandwich cookies, using the frosting as the filling, but I found that they were easier to make and eat as a frosted cookie.  This recipe makes about a million cookies, more or less.

Peanut Butter Kisses


I don't think I need to put the recipe up for this one, I'm pretty sure everyone in the universe makes them already!  I think two batches of cookies a week should get me to Christmas with just the right amount of sugar.

Sunday, November 27, 2016

Sofia's Loft Bed

It took a week longer than anticipated, but we're finished with the main part of Sofi Sue's loft bed!  I used plans from Ana White to make the bed with just a couple of modifications.  Instead of having the entire bed attached to the wall we could only attach one side.  On the other side we have windows so the bed had to be supported with posts.  Here goes!

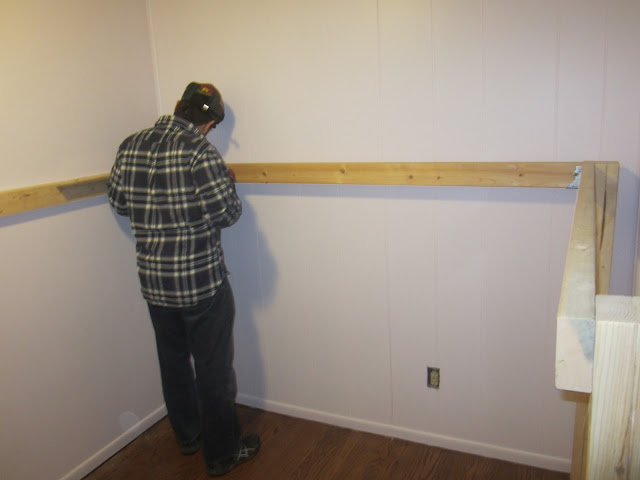
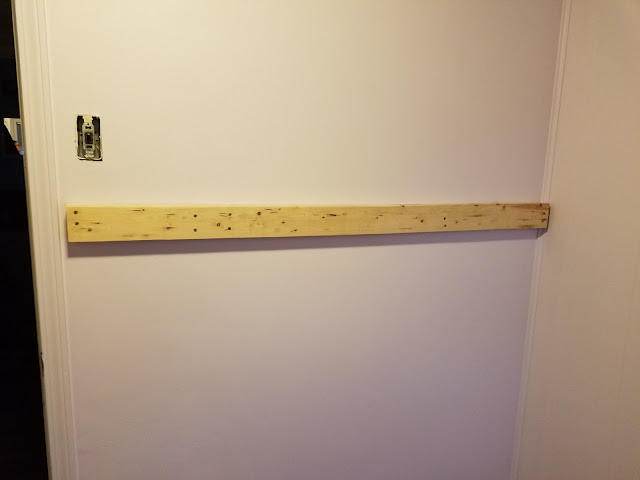
First we attached a 2X4 to the wall.


And then we made legs and another 2X4 on the opposite wall.


We also took a break to have some custard.  I know it doesn't look as if we'd done enough at this point to deserve a break, but with an old house, sloping floors, randomly placed studs and faulty stud finders we felt that custard was definitely in order!


After that we attached joist hangers to the 2X4s and used them to hang our joists (just another set of 2X4s).

Here's the metal joist hanger with a 2X4 joist attached.
Since all of this is likely to be swung from, grabbed and messed with by our two kids we sanded each piece before installing it.


At this point we have used only 2X4s.  The legs on the one side are two 2X4s sandwiched together.  Now we switched to 1X6s to make the floor of the loft.


It's super useful to have a brad gun, installing the 1X6s was a breeze.  Then I cut a 1X6 the length of the loft and attached it to the front to finish off the outside edge of the lot.


The kids seem to like it!


I still have to make the railing and attach the ladder from the bunk beds, but the loft is almost ready for Sofia to move in!

Saturday, November 19, 2016

Pale Purple Paint (Or Is It Pink?)

The walls in Sofia's bedroom are pretty awful.


Fake plastic wood paneling is not the look I am going for in this bedroom.  So I had to paint it.  I started by filling in the small holes in the board and then sanding them down.  The paint guy at Home Depot suggested using Kilz Adhesion Primer.  He told me that I should paint two light coats one hour apart.  Luckily the room is tiny so it didn't take too long to do each coat, but it was a little annoying to paint.  Not only did I have to use a brush to paint the corners and by the ceiling and floor, but I also had to paint in between each fake wood panel before I could roll on the paint over the entire wall.  Then I had to do the first coat of paint 24 hours later.  I had decided to paint the walls in this room a very pale lavender because it is so small and because the ceiling is so dark.  Then Sofi Sue told me she wanted pink walls.  I had already made my mind up on the lavender so I simply told Sofia that the paint was a very light pinky purple color.  When she saw the color on the wall she said "That's not purple, it's just plain pink!"  So we both see the color we want.  Perfect!

Behr Pixie Wing

It took two coats of paint and now the paint in the room is finished!

Thursday, November 17, 2016

Making an Old Stool New Again!

In Sofia's new room I plan on hanging bookshelves on one wall.  In order to have space for books I will need to run the shelves up the wall higher than she can reach.  So I decided to put the stool that we have had in our bathroom for the past 7 or 8 years into Sofi Sue's room so she could reach the higher shelves.  Of course, I didn't want to put it in the room as is!  When on an Ikea trip recently I purchased the cutest wrapping paper.

MYTISK Gift wrap, roll IKEA

I don't usually waste money on wrapping paper.  When we used to get a newspaper I always used that to wrap presents and now that we no longer get a newspaper I purchase the large rolls of brown painters paper from the hardware store and wrap with that.  But I wanted this paper so badly I decided that I would get it for Sofi Sue's room and figure out what to do with it later.  Enter, the stool redo!  Here is the stool.


I bought this years ago for a couple of bucks at a yard sale.  It was originally a light wood but I painted it white.  That wasn't necessarily the best choice for something that would be stood on by dirty little children and it looks a bit worse for wear.  And this is how it looks after I tried washing the dirt and stains off!  I traced the sides of the stool onto the Ikea wrapping paper.


I also measured and cut the paper to fit over the steps.  Using Mod Podge I glued the paper to the stool and then put several coats of Mod Podge on top in the hopes that the stool will hold up better over time.


I'm glad I got the salt in that shot!  It looks ok but definitely shows better when it is not in direct sunlight.  I was disappointed that there were many air bubbles trapped under the paper and all the smoothing in the world wasn't getting those suckers out.  Oh well, the stool is now done and as I'm getting closer to building the loft bed (hopefully we'll be doing that this weekend!) I'm excited about getting all the little things I've made and plan on making into the finished room!

Here are some of the other things I've made so far for Sofi Sue's room:

Wire basket for stuffed animals

T-Shirt rag rug

Jeez, is that it?  I'd better get cracking at all of the fun stuff I want to make for this room!

Tuesday, November 15, 2016

Bedroom Lighting

"Last in bed!" is a phrase heard often in the evenings in my house.  For years my husband and I have rushed through our bedtime routines to avoid hearing those words.  Being last in bed means that you have to be the one to get out of bed when it is time and turn off the light.  No matter how good your central heating is, if you live in Illinois you know the pain of having to get out of a nice warm cocoon of blankets in order to turn off the light.  I've finally solved the last in bed conflict once and for all.  Today I hung a small lamp on the wall next to my bed!  I bought it months ago, but the annoyance of hanging it up caused me to dawdle.  The wall behind my bed doesn't really have any studs.  It is not structural and whoever added it to cut off the useless space under the roof line didn't do it properly.  It has a few 1X3s every couple of feet, but nothing that you can really screw into.

I braved the scary, cobwebby crawlspace behind the wall.   That's how dedicated I am to not having to leave my bed when it is time to turn the light out at night!

So I had to add some wood in order to have something for my lamp to hang from.  I measured the space, it was just over 29" between the two semi-studs.  I cut a  2X4 to length and used my kreg jig to attach some screws to it.  I knew that in this tight space I would have a hard time trying to hold screws, wood and driver at the same time.  Then I screwed it in and skedaddled out of there!


I knew where to add the board because I had drilled a small hole in the wall where I wanted my screw to be and could see the light shining through the hole.  So back on the outside of the wall I just put the screw in that same hole and I was done!


I'm sure most people would have cleaned up their room before taking any pictures, but I'm just that lazy!  I got the lamp at Target at least half a year ago, so if you like it, too bad; it's probably no longer sold there!  I have plans to pretty up the cord and when that's done I will clean the room up so you can see how nice it all looks!

Wednesday, November 9, 2016

Painting a Popcorn Ceiling

So, as you read here I wasn't exactly successful in removing the popcorn ceiling from my daughter's bedroom.  I'm soldiering on anyway and primed it using a brush and some white paint and primer in one I had on hand just to seal off the ceiling.  I didn't want to buy another gallon of primer and the ceiling is so small that the small amount of paint/primer I had left in the can was enough.  Of course, that was painting white on white, so it wasn't apparent before I started in on the purple paint what a pain in the butt painting a popcorn ceiling is!  This is how it looked after one coat.


Pretty splotchy, but I figured the second coat would fix that.


Better, but there are still a lot of little white spots where the paint did not fill the little popcorn craters.  I even used the extra fluffy paint roller!  A third coat in the bad spots would probably do the trick.  The problem is that I bought this paint as a sample from a Sherwin Williams store at its grand opening for half off and the first two coats pretty much used up the can.  I have a little left, but not enough to put on a roller with uncertain results.  I don't want to shell out the money for another sample can, if I'm remembering correctly it would have been about $14 for a sample and I was super excited to say I had painted the ceiling for only $7.  So, now I'm spending between a half an hour and an hour a day with my neck craned backwards using a tiny craft paint brush to individually fill in the craters.


 I know that by doing this the paint I have left will be enough.  The question is, will I lose all function in my neck before I'm finished!?!