Monday, December 26, 2016

A Roof for the Chickens

My chickens are major wusses.  When it's snowed so far this year they have pretty much refused to leave their coop or the area directly under the coop.  They do not like snow.  I decided to give their enclosed run a roof so that they'd have some snow-free ground to scratch around on.

Here is what their run looked like before:


I bought some clear pvc panels so that snow could not get in but sunlight still would.  We wanted to angle the panels away from the coop so that rain would not be funneled right to the coop so we screwed a few 2X4 scraps to the top of the run.


This was a perilous job because to reach the back of the run against the garage I had to sit on a ladder laid across the top of the run:


I spent a lot of time telling Tim how unsafe I felt.  You can see the feet of the ladder wrapped in plastic shopping bags.


I didn't want to get it all muddy and chicken-poopy because we use this ladder inside.  After attaching the wood we screwed in one piece of the plastic panel.  It is long and thin, so it had to run the length of the run along the garage.  Then we laid the second panel overlapping the first and used our drill to drill pairs of holes through both panel.  I then zip-tied the panels together.


This made one large panel that was 8 feet long and about 4 feet wide.  We then screwed the whole thing into the closer side of the run.  It now looks like this:


It does not go the entire length of the run but it will hopefully leave enough clear ground when it snows that the chickens will leave their coop occasionally.  Of course, I don't blame them for holing up inside.  That's what I mostly do in the winter too!

Monday, December 19, 2016

I was forced to make a princess canopy, and it turned out pretty cute!

I am not a fan of the princess canopy that a lot of little girl rooms have hanging over the bed.  My plan for Sofi Sue's room was to paint a cool headboard on the wall behind her bed and call it a day.  But Sofia had different plans.  While hitting the bathroom at a furniture store (we were looking for a couch but it's imperative that we visit the bathroom in every store we go in) we had to walk through the children's section.  They had cute little bedrooms made up to show you how you could use their furniture in your house.  Sofia saw a princess canopy in pink, white and purple and insisted that she had to have it.  In her words "I'd feel safe sleeping in my own room if I had that!"  Have I mentioned that Sofia is an expert at manipulation?  Because of the setup of Sofi Sue's bed we couldn't do the traditional long and flowy canopy.  The mattress is so close to the ceiling because of the loft, so I had to do a truncated canopy.  I chose white because I knew the rest of the room was going to be filled with a lot of color.  But I wanted it to be fun so I also made a rainbow colored border.  Here's the end result:


It's impossible to get far enough away from the bed to show the entire thing at once, but you get the idea.  I bought several yards of mosquito netting and sewed channels in the middle and close to both ends.  I cut a million multi-colored felt triangles and sewed them along the edge like bunting.  Then I used a copper pipe from Home Depot (cut into three equal parts at Home Depot) to attach the netting to the ceiling.


I ran the pipe through each channel I had sewed and then capped the end and attached it to the ceiling with this little copper piece I found near the pipe in the plumbing section.  When I first attached the canopy to the ceiling I realized that it was far too long and the swag allowed the fabric to dip halfway to the mattress.  So I took everything off, cut about 18 inches out of the middle of the fabric, sewed it back together and sewed a new channel for the pipe to go through.  Now the swag is just right.  Sofia let me know it wasn't what she wanted, but before going to bed tonight she finally allowed that it was way better than she had thought it would be.  That's something.  At about $22 this project is the most expensive purely decorative piece in
Sofia's room.  It makes me cringe to spend that much on a non-functional item when the painted headboard would have been so much cheaper; but as it is Sofi Sue's room I suppose it makes sense to let her choose what she wants in it!

The view from the bed.

Sunday, December 18, 2016

From Frumpy to Fabulous: How to Re-Do a Dome Light

I spent some time looking into cute lighting options for Sofia's room.  What was in there before was an ugly dome light with brass finish and frosted glass.  I needed something flush mount because of the low ceilings and the loft.  I loved this light from Pottery Barn Kids:

Star Flushmount

Because I was spending plenty of money in this room already I didn't want to spend another $180 for the light.  In the end I couldn't find anything I liked for a price I liked so I decided to just keep the dome light but spruce it up a bit.  I bought these plastic chandelier gems from Amazon for $7.50:

Clear Acrylic Chandelier Drops - Pkg of 112

I also used some embroidery hoops that I had laying around the house and some thin wire from Home Depot.

First I measured the width of the plastic chandelier drop.


It was 3/4 of an inch wide, so I marked off every 3/4" around the embroidery hoops and using a small bit I drilled a hole through the hoop every 3/4".  


I then cut short pieces of wire and used that to attach the chandelier drop to the hoop with a twist.


I then attached the largest hoop to the ceiling around the light using small hooks.


You can see in this picture that I painted the brass part of the light purple before beginning this project.  I then used more wire to attach each hoop to the smaller one below it.


Although I don't think the finished product looks that great Sofia proclaimed it her favorite thing in the whole room.  That girl really loves sparkle!  You can still see the dome light but the chandelier drops slightly distract you from the ugly light underneath.  I'm getting super close to completing this room!

Wednesday, December 14, 2016

Skinny Book Shelves

I wanted to fit some bookshelves into Sofia's new bedroom so that she could put her library books up there as well as any books that are her particular favorites.  That way if she wanted to hang out by herself in her room she'd have something to do.  The problem is that her room is spatially challenged.  The only possibility was to hang narrow bookshelves on the one empty wall in the room.  In the kid's old bedroom I had hung rain gutter bookshelves that I loved.  You can kind of see them in this picture, evidently I never actually took a finished picture of them.

You can kind of see the shelves behind Little Sofi.

  I used the instructions at Sunshine on the Inside.  Here are her shelves:

Sunshineontheinside.blogspot.com made corner shelves, mine were straight across the wall.

The problem with those is that they aren't as cheap as you'd expect.  I wanted four roughly four foot bookshelves.  If you bought two gutters at $4 each and cut them in half that would be four shelves for only $8.  Sounds great, but you also need end caps for each shelf and at almost $8 a cap that puts the final cost for 4 shelves at around $70!  This time around I decided to look for a cheaper option.  Now that I'm no longer scared of power tools I realized that it wouldn't be that expensive to just make wood shelves.  I bought 1X4s and 1X2s and just glued and nailed them together.

1X4 Backing
Glued and nailed another 1X4 on top

Glued and nailed a 1X2 to the face of the bottom board

After sanding off the edges to make sure no one would be impaling themselves on the shelves I painted the backs purple.  Since I already had the purple paint from my laundry room counter my only cost for the project was the wood for the shelves.  All 4 shelves ended up costing a little over $20.  And they don't look half bad!


Adding some books to the shelves will cover up the screws.  I also have to fix a couple of holes that I accidentally drilled in the wrong spot in the wall and on the shelves.  I'll show the shelves filled with books once I have everything else in the room completed.

Tuesday, December 13, 2016

Hanging Clothing Rod

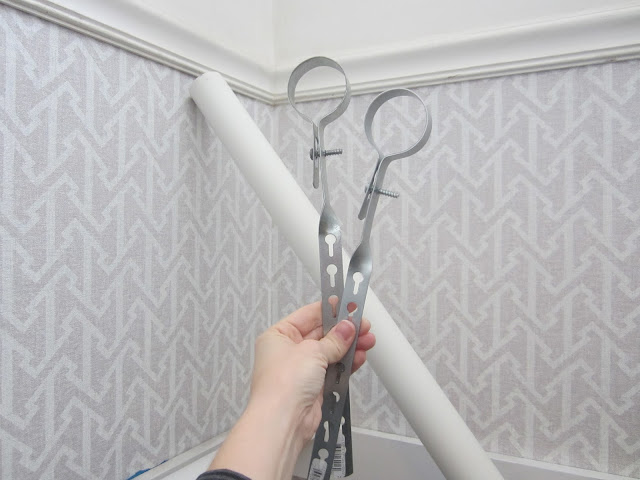
Part of the area under Sofia's loft needs to be used as a closet.  I looked all over to find a cheap, appropriately sized hanging clothing rod but was having difficulty.  I wanted it to hang straight down from the underside of the loft but most of the rods I found needed to be attached at either end to a wall instead.  Once again I was going to need to make something up and I wanted to do it as cheaply as possible.  It's no fun spending money on something boring like a clothing rod!  I hit Home Depot and ended up in the plumbing aisle.  Here's what I got:


I started out with something like a 2 1/2" pvc pipe before Tim pointed out that it was too fat for a hanger to hook over.  So I went back and got a 1" pvc pipe instead.

First I shortened the metal clamps (I don't know the proper name for these things!) by bending them back and forth until they snapped.


I then primed and painted them the same color as the underside of the loft and wrapped them with yarn to make them prettier.


Then I screwed them into the underside of the loft.


You can see where some of the paint flaked off here.  That happened when I had to bend the metal strip a bit to get it to sit right on the wood.  I can always fix this with a little extra primer and paint later, but it isn't that noticeable so I may just leave it.

Then I sanded the writing off of the pvc pipe so that it would not look so junky.


I slid the pipe through the hangers and added a little glue to hopefully keep it in place.  Done!


Sofia's room is a bit of a mess right now, but hopefully soon I'll have it all cleared out and she can really use the under-loft area to hang out in.

Sunday, December 11, 2016

How Much Furniture Can You Squash in an 8X8 Room?

When it's child sized, surprisingly a lot!  Sofia's room is so small it's ridiculous.  But the area underneath her loft has to serve as her closet as well as her play area so we had to figure out how to make it work.  We needed to fit a clothes rod, shelving, a seating area, a desk and toy storage.  Here's what I shoved in there:


I put a small arm chair that I bought Sofi Sue several years ago for $5 at a garage sale.  I don't like the print and if I'm feeling brave one day I'll try my hand at reupholstering it.  That and the small chair at the table cover seating.  The table will be a great place for Sofia to do art and maybe even homework.  The wire basket that I wrapped in yarn will be used for toy and stuffed animal storage.


On the other side of the under-loft area I have her clothes rod (more on that later) and a shelving unit.  I actually bought two of these at Aldi (they carry the strangest assortment of random products).  I had planned to put both in the room now but realized that it was getting pretty cramped.  So I'm saving the second set of shelves for when Sofia gets too big for the table.  We'll move that out and move the extra shelves in.  We're getting really close to being done!


Saturday, December 10, 2016

Gussying Up Sofia's Bedroom

Now that the loft is completed and painted I've been slowly adding to Sofia's room.  The other day I added a few decorative items that made Sofi Sue extremely happy.

Butterfly decals from the dollar store:


A lampshade that I've owned for probably 15 years but never used:


A mess of paper lanterns from both the dollar store and China Town:


There are a ton of projects still to do but it's fun to add the pretty stuff!

Wednesday, December 7, 2016

New Name For My Blog: You Can Do That and the Internet Can Show You How!

I think that the internet is amazing.  If there is anything you want to learn how to do all you have to do is Google it.  Someone out there will have made a YouTube video to help you out.  Last week I was extremely bummed to find out that my washer had quit spinning and agitating.  Now my clothes were not getting clean and what was left in the washer was a sodden mess of dirty clothes.  After bemoaning the fact that we had just missed all the 40% off black Friday sales I had a productive conversation with another mom who suggested I look it up on YouTube and see if I couldn't fix it myself.  The washer is probably about 20 years old so paying for a repairman to come out and fix it seems like a waste.  I really wouldn't mind buying a new one but I want to wait until a big sale.  So I just need this washer to hang on until Presidents Day.  I didn't in a million years believe that I was going to be able to find the type of help I needed on the internet and fix this myself, but as I was going to have to go out and buy a washer anyway I figured I might as well take a stab at it.  And it worked!  I found this video online that showed exactly what to do when your washer was refusing to spin anymore.  I watched the video a couple of times, did exactly what it told me to do, and two days later I have a fully functional washer!  I am completely flabbergasted that I was able to do this, and I have pictures to prove it!

All of these pictures are of me taking it apart:


I took a million pictures to help remind me what pieces and wires went where.  There are no pictures of the actual broken piece or of me putting the whole thing back together because I can't find the battery charger for my camera.  But thanks to YouTube I would strongly recommend trying to fix more stuff around the house by yourself.  I saved a thousand dollars by buying a $20 part and spending some time getting my hands dirty!

Tuesday, December 6, 2016

Cute Outlet Covers

So yesterday I made these:


There's one more cute light switch cover that I evidently didn't take a picture of.  I just used ModPodge and the adorable wrapping paper from Ikea that I used on Sofia's stool.

First I cut the paper to size:


Then I ModPodged the cover:


I stuck the paper onto the cover:


And then I cut out where the openings were.  For some reason I stopped taking pictures at this stage!

If I were a good blogger this picture would also show you how I used an x-acto knife (sp?) to cut out the openings.

After this I put a couple of extra layers of ModPodge on top of the paper and then Sofia hung them up herself.  Unfortunately she refused to let me take a picture of her working, so that step is also picture-less.  Oh well, at least we can turn on and off the lights now without electrocuting ourselves.  And since I used the old outlet covers, ModPodge I've had for years, and the leftover scraps of wrapping paper from another project this craft was Free!