Tuesday, December 13, 2016

Hanging Clothing Rod

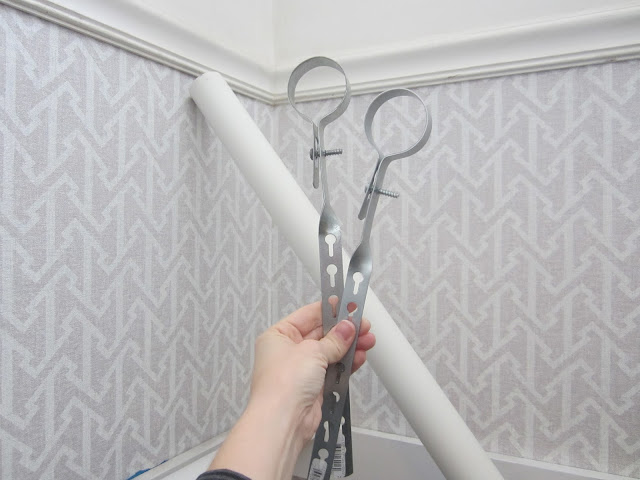
Part of the area under Sofia's loft needs to be used as a closet.  I looked all over to find a cheap, appropriately sized hanging clothing rod but was having difficulty.  I wanted it to hang straight down from the underside of the loft but most of the rods I found needed to be attached at either end to a wall instead.  Once again I was going to need to make something up and I wanted to do it as cheaply as possible.  It's no fun spending money on something boring like a clothing rod!  I hit Home Depot and ended up in the plumbing aisle.  Here's what I got:


I started out with something like a 2 1/2" pvc pipe before Tim pointed out that it was too fat for a hanger to hook over.  So I went back and got a 1" pvc pipe instead.

First I shortened the metal clamps (I don't know the proper name for these things!) by bending them back and forth until they snapped.


I then primed and painted them the same color as the underside of the loft and wrapped them with yarn to make them prettier.


Then I screwed them into the underside of the loft.


You can see where some of the paint flaked off here.  That happened when I had to bend the metal strip a bit to get it to sit right on the wood.  I can always fix this with a little extra primer and paint later, but it isn't that noticeable so I may just leave it.

Then I sanded the writing off of the pvc pipe so that it would not look so junky.


I slid the pipe through the hangers and added a little glue to hopefully keep it in place.  Done!


Sofia's room is a bit of a mess right now, but hopefully soon I'll have it all cleared out and she can really use the under-loft area to hang out in.

Sunday, December 11, 2016

How Much Furniture Can You Squash in an 8X8 Room?

When it's child sized, surprisingly a lot!  Sofia's room is so small it's ridiculous.  But the area underneath her loft has to serve as her closet as well as her play area so we had to figure out how to make it work.  We needed to fit a clothes rod, shelving, a seating area, a desk and toy storage.  Here's what I shoved in there:


I put a small arm chair that I bought Sofi Sue several years ago for $5 at a garage sale.  I don't like the print and if I'm feeling brave one day I'll try my hand at reupholstering it.  That and the small chair at the table cover seating.  The table will be a great place for Sofia to do art and maybe even homework.  The wire basket that I wrapped in yarn will be used for toy and stuffed animal storage.


On the other side of the under-loft area I have her clothes rod (more on that later) and a shelving unit.  I actually bought two of these at Aldi (they carry the strangest assortment of random products).  I had planned to put both in the room now but realized that it was getting pretty cramped.  So I'm saving the second set of shelves for when Sofia gets too big for the table.  We'll move that out and move the extra shelves in.  We're getting really close to being done!


Saturday, December 10, 2016

Gussying Up Sofia's Bedroom

Now that the loft is completed and painted I've been slowly adding to Sofia's room.  The other day I added a few decorative items that made Sofi Sue extremely happy.

Butterfly decals from the dollar store:


A lampshade that I've owned for probably 15 years but never used:


A mess of paper lanterns from both the dollar store and China Town:


There are a ton of projects still to do but it's fun to add the pretty stuff!

Wednesday, December 7, 2016

New Name For My Blog: You Can Do That and the Internet Can Show You How!

I think that the internet is amazing.  If there is anything you want to learn how to do all you have to do is Google it.  Someone out there will have made a YouTube video to help you out.  Last week I was extremely bummed to find out that my washer had quit spinning and agitating.  Now my clothes were not getting clean and what was left in the washer was a sodden mess of dirty clothes.  After bemoaning the fact that we had just missed all the 40% off black Friday sales I had a productive conversation with another mom who suggested I look it up on YouTube and see if I couldn't fix it myself.  The washer is probably about 20 years old so paying for a repairman to come out and fix it seems like a waste.  I really wouldn't mind buying a new one but I want to wait until a big sale.  So I just need this washer to hang on until Presidents Day.  I didn't in a million years believe that I was going to be able to find the type of help I needed on the internet and fix this myself, but as I was going to have to go out and buy a washer anyway I figured I might as well take a stab at it.  And it worked!  I found this video online that showed exactly what to do when your washer was refusing to spin anymore.  I watched the video a couple of times, did exactly what it told me to do, and two days later I have a fully functional washer!  I am completely flabbergasted that I was able to do this, and I have pictures to prove it!

All of these pictures are of me taking it apart:


I took a million pictures to help remind me what pieces and wires went where.  There are no pictures of the actual broken piece or of me putting the whole thing back together because I can't find the battery charger for my camera.  But thanks to YouTube I would strongly recommend trying to fix more stuff around the house by yourself.  I saved a thousand dollars by buying a $20 part and spending some time getting my hands dirty!

Tuesday, December 6, 2016

Cute Outlet Covers

So yesterday I made these:


There's one more cute light switch cover that I evidently didn't take a picture of.  I just used ModPodge and the adorable wrapping paper from Ikea that I used on Sofia's stool.

First I cut the paper to size:


Then I ModPodged the cover:


I stuck the paper onto the cover:


And then I cut out where the openings were.  For some reason I stopped taking pictures at this stage!

If I were a good blogger this picture would also show you how I used an x-acto knife (sp?) to cut out the openings.

After this I put a couple of extra layers of ModPodge on top of the paper and then Sofia hung them up herself.  Unfortunately she refused to let me take a picture of her working, so that step is also picture-less.  Oh well, at least we can turn on and off the lights now without electrocuting ourselves.  And since I used the old outlet covers, ModPodge I've had for years, and the leftover scraps of wrapping paper from another project this craft was Free!

Sunday, December 4, 2016

Painting the Loft Bed

It took me a while to decide what I wanted to do with the loft as far as paint goes.  At the beginning of this project the plan was to paint the entire loft bright pink.  After painting the walls and ceiling purple I wasn't so sure about that.  I thought it might be a little much in such a small room.  So I decided to paint the loft white and the underside of it light blue.  Then I changed my mind again and decided to leave the parts of the loft you can see unpainted and just paint the 2X4s magenta, so it would look kind of striped from underneath.  Finally I decided to leave the part of the loft you can see from above unpainted wood and to paint the entire underside of the loft light blue.

Here it is unpainted.


Here it is painted blue!


You can see that I left the part right next to the wall unpainted.  I felt that the area was so narrow that I would definitely get paint on the wall and the only way to see it is to lie on your back underneath the loft.  I started by priming the wood with Zinsser's BIN Primer, there's no way you'd get good coverage on bare wood without priming first.  Then I put two coats of Behr's Tahitian Sky on it.  Now that all of the painting is done in the room I can start moving stuff in!  I'm hoping that we can move Sofia in there next weekend.  Then we'll see if the kids really do want separate rooms (no going back at this point) or end up realizing that it's a lot more comforting to have someone in the room with you at night.  Fingers crossed that they love being on their own!


Saturday, December 3, 2016

Christmas Ornaments

We put up our Christmas tree today and I brought out all of my old ornaments.  We have a bunch of generic ornaments for everyone to hang on the tree and then each person has their own ornaments that they've made over the years.  Each year we decorate one ornament and my pile is the biggest!  Tim didn't decorate ornaments as a kid and my children have only been decorating ornaments for less than a decade.  Here are mine lined up in order starting in 1981:


There's a year missing here and there.  Here's the first one in 1981:


 Here are some of my favorites done in my late teens:

I especially like the cherubs eye slowly leaking down its face!
Here is the one I meant to be my last:


And here's the one I somehow was bamboozled into painting the very next year:

Somehow the quality has gone downhill.  I don't think my heart was in this one.
Now my children are making one a year so that when they eventually move out (they both insist they'll be living with me forever) they'll each have their own stash of ornaments to decorate their own trees.  Thanks for starting such an awesome tradition Mom and Dad!