Wednesday, June 29, 2016

Plants


Look at the flowers that bloomed on my Casserta Summer Squash and Sunset Runner Beans!

Squash
Beans
Yesterday we saw that a lot of stalks had been bitten off.  We blame it on Art, the squirrel who lives around our house.  It's possible that we might be to blame for him hanging around our house so much since we feed him peanuts every night at dinner on the front porch.


Ungrateful animal!  Hopefully he won't eat these flowers or the squash that will come from them.

Yesterday the kids chose bowls from Goodwill and planted little succulent gardens.  Aldi had succulents on sale for $1.88 each!  They decorated their gardens with Pokemon, of course.


Yay plants!

Tuesday, June 28, 2016

A Yellow Paint That Doesn't Blind Me!


It took me a long time and many paint swatches to decide on the perfect yellow for my book case wall.  I first tried a variety of yellows that I had searched for online.  I put in the search "best yellow paint color" and came up with a variety that I then bought samples of from Home Depot.


None of these colors seemed right and I despaired of finding the perfect yellow.  Then I saw it.  It was shiny and beautiful and exactly what I had seen in my mind:

IMG_1357
This beautiful dresser is from resplendentcrow.com

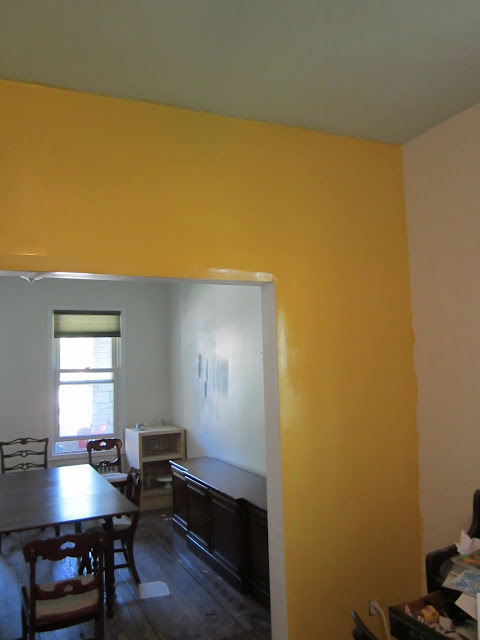
The paint is Van Gogh Yellow from Fine Paints of Europe.  After doing a little more research online I called a store in my area that carries this type of paint.  The clerk that I spoke with over the phone said that it cost around $130 for a gallon of this paint.  You would think that that would have crushed my dreams, but I still felt that $130 was not too much to have an awesome and striking feature bookcase wall.  After all, I had been considering spending around that much to wallpaper that wall and then put the bookshelves in front of the wallpaper.  So I went into the store to see a sample of the paint.  There were little imperfections all over the sample and the clerk told me that that was where tiny bits of dust had landed on the paint while it was drying.  Now my dream was crushed.  I gave up on Van Gogh Yellow as it was not a color they could color match.  I ordered some yellow swatches to tape up on the wall from Benjamin Moore.  I decided on Bold Yellow.  After priming the wall with tinted primer and putting up two coats of Bold Yellow I realized that I had made a mistake.  The wall was too bright, almost neon.  And it didn't coordinate well with the Simply White I had next to it.  So I went back to the store and had them add some orange to tone down the yellow a bit.  Three more coats of paint later and I have a color that I am very happy with!


It's not quite as sunny as Van Gogh Yellow, but it does make me happy to look at it.  Now I need to get going on the book shelves!


Friday, June 24, 2016

I Have No Idea What I Am Doing In The Garden

So, some of my garden is shooting up like crazy and some  is just limping along.  Some, I'm afraid, might be dead.  My runner beans are doing ok but haven't gotten very large yet:


They do have some company, I believe Sofi Sue's owl spent the night with them:


Nothing else is growing in there, even the little sprouts for whatever flowers I had planted have died.  My summer squash, on the other hand, have taken over their garden bed:


The flowers I planted in the middle of this bed are now covered by leaves, so are not likely to be long for this world, either.  And look at that sad little spinach in the front:


Yup, it's bolted.  I didn't even eat one leaf yet and now, as the internet tells me, the leaves should be inedible.  Oh well, I'll let them go to seed and use those to try a little earlier next year!

In my last garden bed it's looking a little sparse:


The small plants you see in the upper left corner are jalepeno pepper plants.  Hopefully they'll stay alive and give Tim some delicious little peppers later this summer.  What you probably can't see because they are so small and delicate are our carrot and asparagus plants.  Here's a close up of the two:

Rainbow Carrot

Asparagus

And here are what I hope are a pumpkin and a watermelon:


I don't know which is which, and I'm not even sure that that's what they are, but I've got my fingers crossed!  I don't think we're getting any tomatoes this year, I planted them in the ground in the same place as last year, but this year all that's shown up is weeds.  Oh well.  My fruit bushes look ok so far this summer:


We have a couple of raspberries almost ready to pick!

Our blackberry is flowering, hopefully we'll get our first berries off of this bush this year!

I'm a little worried about my apple tree, some of the leaves are looking a little scorched:


I'm hoping that we'll get some food out of the garden, despite my lackadaisical gardening style!

Thursday, June 23, 2016

Scary Yellow Primer

So I actually bought my paint the other day to turn my wall into a yellow burst of happiness!  I bought Benjamin Moore High Gloss Advance in Bold Yellow.  At the store the associate suggested that I tint my primer as close to that color as possible to help with coverage.  So I took my primer back to Home Depot and got it tinted Bold Yellow, although the paint person told me that it wouldn't be as dark as the actual Bold Yellow.  I slapped up my first coat of yellow primer on the wall today and now I'm a little nervous!  I'm hoping that the actual paint will be a bit darker.  I'm going for sunny; not childish!


Monday, June 20, 2016

Now I Can Paint! Oh Wait, Maybe Not.

On my weekly calendar I wrote "Prime Wall" for Monday and "Paint Wall" for Tuesday.  So, today I pulled out the drop cloth and ladder and my fashionable coveralls and primed the wall between the living and dining rooms.  It looks a bit better, although you can still see the lovely dappled paint job that was there before.


But after priming, the flaws in the wall were suddenly much easier to see.  The flaws that were already there, as well as the flaws in my mudding job.  I'm terrible at using joint compound.  I've tried it three times now, and I'm 0 for 3!  You'd think that with experience I would be getting better, but that hasn't happened yet.


This is what it looks like all the way around the door opening.  So now I'm going to have to cross off "Paint Wall" on Tuesday and replace it with "Fix wall and then prime it again!"  Yay!

Thursday, June 16, 2016

Filling the Gap, Part 2

After searching around the internet a bit I decided on my game plan for filling the gap.  I would buy GreatStuff to fill the large gap and then smooth it all out with some joint compound.


First I vacuumed and cleaned out the gap.


Then I began to fill in the gap.  GreatStuff is a product that you can only use one time.  If you still have anything left in the container after finishing your project you will have to just throw it away as the foam dries up in the straw applicator and no new foam can come out.


After allowing the foam to cure for a couple of days I used a drywall saw to  remove the excess foam.


I can see a few spots where I wish I had filled in with the foam better, but it's too late now!

Then I applied my first coat of joint compound.  Doesn't look too promising at this point!


Here it is after sanding, applying a second coat, sanding again, applying a third coat, and....you guessed it, sanding a third time!


 It looks acceptable.  I then sanded the wall to try and get rid of any small bumps that the textured paint caused.  I first tried sandpaper on a sanding block attached to a painter pole.  It didn't look or feel like it had done anything.  So I went for my palm sander.  It feels slightly less textured, but it's hard to tell.  My next step will be to prime the entire wall.  Hopefully that will make everything nice and smooth so that I can move on to actually painting!  Bright yellow wall, here we come!


Filling the Gap, Part 1

Monday, June 13, 2016

Luxury Vinyl Plank flooring in the Basement Laundry Room


Ta Da!

I've been very slowly working on the basement laundry room.  So far all I have done is paint the walls and ceiling.  That took me a couple of months to do so it should be no surprise that putting in the flooring I have chosen is taking forever as well.  I bought this Shaw Luxury Vinyl Plank Flooring from Lowes.  I chose floating vinyl planks because our laundry room has had water issues in the past.  Hopefully putting in new gutters and rodding out our main line has solved that problem for good, but just in case I decided to go with flooring that can get wet without becoming damaged.  Glue and stick vinyl would have been cheaper, but the glue is a no-go with damp conditions, so the click and lock floating floor was definitely the way to go.  Before installing I needed to fix a few holes and ridges in the concrete floor.  There were also a few spots where lumps of copper were sticking out of the floor.  I have no idea what they are from, but my helpful neighbor Ken had a grinder that cut the copper out in just a couple of seconds.  I had serious grinder envy, so I ended up buying an angle grinder of my very own to take care of the areas where the concrete came up in ridges.  After grinding down several parts of the floor I used some ready made concrete to fill in the areas that were too low and uneven.


  The finished product is ridiculously far from perfect, but hopefully it has evened the floor out enough that the imperfections won't show through the vinyl.

Once the floor was prepared I started laying down my flooring.


I used my miter saw to make the cuts:


I ended up connecting an entire row end to end first and then clicking that row into the previous one.  I was never able to get the hang of how you could click one plank in at a time, but this worked out just as well.  When I got to my sump pump cover I had to just eyeball it and use a sharpie to mark where my cut should be.


I then used my sawzall to make the cut.  It wasn't precise, but I plan on using some caulk to fill in around the cover so that you can't see the bad cutting job.


After finishing my floor looks like this:


I would have preferred something that didn't mimic the look of a natural product as I think that always ends up looking fake, but awesome flooring like THIS doesn't sell in the US!  I'd rather have a fun pattern but I had to work with what was available to me.  And for just under $2 a square foot, I'm pretty pleased with how it turned out.

Monday, June 6, 2016

Popcorn Ceiling Asbestos Test Results

No Asbestos!  Woot!  That took a lot less time than I thought it would.  I sent in my popcorn ceiling sample on Friday, it traveled to California and was tested in only three days!  So now I get to try and remove popcorn ceiling.  I'm suddenly a lot less enthusiastic about the results!

I wrote about getting my ceiling tested HERE.

Saturday, June 4, 2016

Testing Our Popcorn Ceiling for Asbestos

In Sofi Sue's future bedroom the ceiling is very low.  Because we are making a loft for her I am worried that she may somehow scrape herself on the bumpy ceiling.  I would like to remove the popcorn, but Mom brought up the possibility of asbestos in the popcorn ceiling.  So I have to get my house tested for asbestos, again!  The first time we had to test linoleum in the dining room and basement.  I had someone come out to the house to take the samples which cost a couple hundred dollars.  The results were happily negative.  This time I decided to go the cheaper route.  I am collecting the sample myself and sending it in to a lab to get it tested.  It only costs $30.  First I sprayed the ceiling with water:


Then I used a box cutter to score a small square in the ceiling:


Then I scraped the inside of the square into a plastic bag:


I labeled the bag and sent it in on Friday.  The lab is in California so it hasn't arrived there yet.  I'll let you know the results when I get them!

Friday, June 3, 2016

Behr Marquee vs Behr No VOC Paint and Primer in 1

I've been painting my own walls for the past 14 years and I pretty much always bought whatever the cheapest Behr paint was at the time.  Since having kids I've opted for the no VOC paint and primer in 1 so that I wouldn't have to worry about painting in winter time with closed windows.  For some reason, on my last trip to the Home Depot I decided to give the more expensive Behr Marquee a try.  The paint guys behind the counter recommended it and I had seen a ton of commercials online (I watch a lot of home improvement shows on the internet) that showed Marquee covering a dark purple wall with a violet paint in one coat.  I was painting my dirty off white walls in the living room Benjamin Moore's Simply White (color matched to Behr, of course).  Although most of the walls were already a whitish color, there were a few spots where I had tested out potential paint colors which weren't white.


I had high hopes but had still given myself enough days for a second coat, just in case.  Here are the walls after coat number one:


As you can see, the yellows and the blue/greys are both still visible.  So I did coat number two:


It doesn't translate to my poor photography very well, but there are still faint outlines of yellow and blue/grey showing through the second coat.  I had to go ahead and paint over just those spots for  a third coat before they disappeared.  And even painting over the off white walls the second coat was definitely necessary.  In future, I don't think I would shell out the extra bucks for Behr Marquee.  If it had covered in one coat, as promised, then it would have been worth the money.  If I have to paint two coats either way, I might was well save some money and go with the no VOC option.